With Reallusion’s recent update to IClone to version 5.5, new functionality has been added in the ability to edit Terrain directly within the program. Reallusion suggests that if you wish to create entirely new terrain, you should purchase Earth Sculptor, their add-in terrain creator, to adjust the material masks for any changes you make. If, however, you don’t possess Earth Sculptor, it is still easy to create material masks for simple terrain projects.
This tutorial assumes a basic familiarity with both Photoshop and IClone. There are plenty of fine tutorials available demonstrating the use of each.
For this example, we will create a simple terrain with some rocky pinnacles in a desert landscape.
1. Setting up your Photoshop document
Load a terrain map in IClone, go to the Terrain tab, and export the height map to Photoshop. I chose the Butte terrain. The image you export will contain a greyscale height map of the terrain, but we are not interested in this. Exporting the file this way simply gives you the appropriate file type and size for the project.
Create five layers above the height map. I named them as follows: Background, Height, Green, Red and Blue. Once you have your new layers, you can delete the original height map, or keep it as a reference if you choose.
Fill the Background layer entirely with black (0,0,0). This layer will represent the lowest parts of your terrain for the height map, and the fourth material type in your material mask map.
2. Creating and exporting the height map.
The height map is simply a greyscale representation of height, rather like a contour map. The brightest, whitest parts of the map are the highest parts of the image, and the darkest parts are the lowest.
For this example, the flat desert plain is the lowest part of my terrain, so all I need to do is draw in my rocky pinnacles as highlights. (If you were drawing a more varied landscape, you might want to start with a dark grey background instead of black, and add shadows and highlights to create your terrain).
To draw the pinnacles, select the Height layer, set the foreground colour to white, and take a photoshop brush with soft edges and a size of about 100 pixels, and draw some white blobs where you want the pinnacles to be. The final result should look something like this:

For a more gradual terrain, you might use a brush with softer edges, decrease the opacity value of your brush, or adjust the brightness of the image. You could choose to paint in grey instead of bright white. You might paint on layers so you could adjust the opacity of each independently. The height and smoothness of the height map is also adjustable in IClone once it has been imported.
Since the pinnacles should be relatively steep-sided, the rapid change from low to high (black to white) is quite suitable.
I took a large soft-edged eraser, of about 50 pixels and an opacity of 25%, and used it to adjust the pinnacles, as below, in order to make them a little more interesting:

Now is a good time to save your Photoshop document. You should also export the Height Map, by selecting “Save As” from the File menu, and selecting .png as the file type.
If you go into IClone and load a terrain into your project, you can double click on the height map in the Terrain settings, and load in a new map. Select the height map file you just created, load it in, and you will instantly see the basic shape of your pinnacles. Here is mine with the Butte material map texturing it.

3. Creating the material mask map
This is the part that Reallusion would like you to purchase Earth Sculptor to do. I have never tried Earth Sculptor. It does look like a convenient tool, with a “what you see is what you get” style interface that allows you to paint textures directly on the terrain. Using Photoshop requires a degree of back-and-forthing, but seems reasonable for simple projects such as this one.
To achieve a material mask with Photoshop, we will colour in the areas that correspond to four different materials that will be present in the final terrain. It is possible to set what these materials are within IClone later. For this part of the exercise you only have to consider which parts of your scene will use different materials.
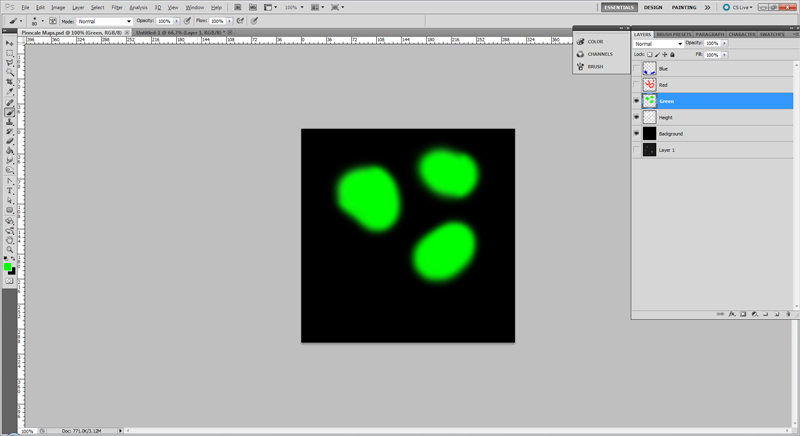
Green layer:
Lets start with the green layer. We will use it for the rock face material for the pinnacles themselves. Select the Green layer, and choose a large soft-edged brush (the same one you used to draw the pinnacles is fine). Use a pure green colour with the RGB value of (0, 255, 0).
Now, simply colour in solid green blobs covering the pinnacles on the height map you drew before. The result should look something like this:
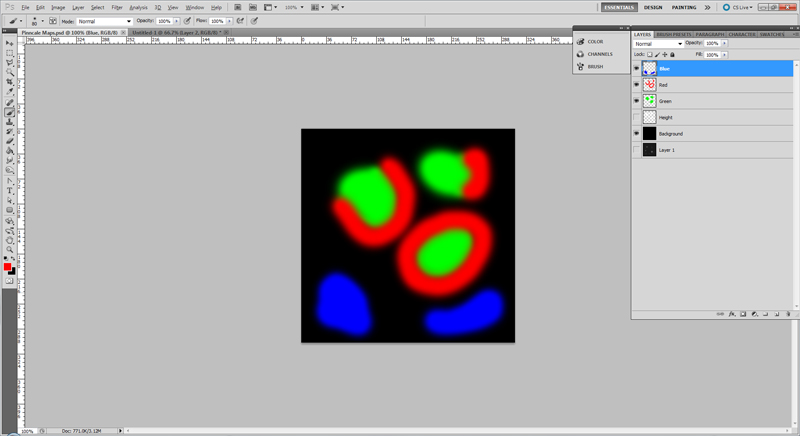
Red layer:
Now for the red layer. This is going to be the stony ground immediately around the base of the pinnacles. Select the Red layer. Take a slightly smaller soft edged brush, set the foreground colour to Red (255,0,0) and draw some rings or semi-rings of red to show where this material will be.
There is no need to fill the interiors of the rings in,, although you can if you like–they should look like strange irregular doughnuts. The edges of the red and green should overlap at least a little.
Once finished, you should have something like this:

Blue layer:
This layer is going to be some cracked ground areas in the main flat area of the landscape. If you were working on a detailed project, you could consider including these depressions as part of the terrain map for added realism. Here, let us simply make them a different material, for interest sakes.
Select the Blue layer, and set your brush to Blue, with RGB colour settings (0,0,255), and draw some blobs in an empty space where they don’t overlap with anything you have previously drawn.
It should look something like this:
Exporting the Material Mask Map.
Export the file as a png file. Now you can go into IClone, and load the Material Mask layer you have just created.

4. Tidying up:
Not bad – you can see the terrain and the material map do match up – but the edges between the different materials are too blurry, especially around the base of the pinnacles, where the Red and Green layers meet. Let’s adjust that a little.
To fix the problem above, I went back to myPhotoshop document, and increased the size of the green blobs a little. I also positioned the green layer on top of the Red layer, instead of underneath, so all the green is showing.
Here is my material mask after tidying those edges. It doesn’t look very different – the green area is just a little larger.

After tidying, make sure the three colour layers and the background layer are the only ones visible, and export your material map again. You may want to save it under a different name, in case you want the original one later.
Import the new material map into IClone.
Here are the results of my change – much better!

Of course, your material map may require you to make slightly different changes to your material borders, but I’m sure this demonstrates how easily it can be done. You can go back and forth between Photoshop and IClone and many times as is necessary to adjust your material map to your satisfaction.
5. Applying textures:
You can read about how to change the materials of terrains and adjust the settings in the IClone help files. It is straight forward enough, and if you have already used IClone to change textures of props or characters, you should be familiar with the process already. With the Butte terrain, the material names correspond to the colour layers we used as follows:
Height Map 01 = Red
Height Map 02 = Green
Height Map 03 = Blue
Height Map 04 = Black
Here is what my terrain looks like after playing with the terrain settings and quickly applying some new textures to the map:

Obviously better results could be achieved with a more detailed height map and fine adjustments to the material map. The purpose of this tutorial is, however, to demonstrate that adjusting the material masking layer is certainly possible using Photoshop and well within the capabilities of users familiar with materials, textures and layers in Photoshop and IClone.